Introduction
Knit caps rank among the most popular items for custom embroidery — used for team gear, corporate giveaways, church groups, and seasonal promotions. The promotional headwear market generates $2.4 billion annually, with each branded cap producing over 3,380 impressions throughout its lifetime.
Yet their stretchy ribbed texture makes them notoriously difficult to work with compared to woven fabrics. Embroidering on knit caps looks simple but frequently produces puckered designs, sunken stitches, or warped logos when done without the right setup. Results depend heavily on preparation, hooping technique, and digitizing.
Knit fabrics are elastic and deeply textured — two properties that work against clean embroidery. When a needle penetrates the knit, the fabric pulls toward the needle and snaps back, causing registration errors. The raised ribs also let unsupported stitches sink into the material and disappear. Success comes down to mechanically locking fibers in place without crushing them.
Key Takeaways
- Machine embroidery on knit caps requires cutaway stabilizer underneath and water-soluble topper on top
- Always use a ballpoint needle (size 75/11) to push fibers aside instead of piercing them
- Hoop with just enough stretch to match how the cap sits on a head; overstretching causes warping and distortion
- Limit embroidery to the cuff fold area — typically no wider than 100mm on standard beanies
- Professional embroidery services eliminate setup errors and deliver consistent results across bulk orders
What You Need to Embroider on Knit Caps
Having the right materials before starting prevents mid-project failures. A missing topper or wrong needle type causes most beginner mistakes on knit fabric.
Equipment and Supplies
Core items needed:
- Knit cap with tight, even weave preferred
- Embroidery machine (or needle and hoop for hand embroidery)
- Cutaway stabilizer (2.5oz to 3.0oz weight)
- Water-soluble topper stabilizer (film or mesh)
- Temporary spray adhesive
- Air-erase marking pen or tailor's chalk
- Clips or pins to secure excess fabric during stitching
Needle and Thread Selection
Use a ballpoint needle (size 75/11 or 80/12) for knit caps. The rounded tip pushes yarn fibers aside rather than piercing them, preventing snags and holes that appear after washing. Sharp needles sever the looped knit structure, creating pulls and pinholes that unravel around the design.
For thread, the choice between polyester and rayon matters more than most embroiderers expect:
- 40-weight polyester — resists chlorine bleach, UV exposure, and temperatures up to 95°C (203°F); best for frequently washed winter headwear
- Rayon thread — degrades above 60°C (140°F) and fades faster under harsh laundering; avoid for caps that see regular washing
Design Preparation
Embroidery designs intended for woven fabric need adjustment for knit caps:
- Reduce stitch density by 20-30% to preserve fabric stretch and prevent stiffness
- Add underlay stitches (edge-walk plus double zigzag) to bridge the valleys between ribs
- Check design dimensions against the embroidery area before stitching (typically 72mm × 50mm for small hoops, up to 100mm wide for medium hoops)
How to Embroider on Knit Caps: Step-by-Step
This process applies to machine embroidery on knit caps with a folded cuff. Each step builds on the previous one — skipping any step (especially stabilization or basting) sharply raises the chance of failure.
Step 1: Mark the Placement
Measure the height of the cuff fold on the cap and mark the center point where the design will sit using an air-erase pen. The top of the design should face toward the open edge of the cuff so it reads correctly when the cuff is folded up.
Print a template of the design from embroidery software to test placement before touching the machine.
Step 2: Apply Stabilizer and Prepare the Hoop
Lightly spray the cutaway stabilizer with temporary adhesive, then hoop only the stabilizer. The cap itself is not hooped conventionally — the inner hoop frame slides inside the cap during setup.
Step 3: Hoop the Cap with the Correct Stretch
Turn the cap inside out, slide the hooped stabilizer frame inside, and align the center marks.
Critical principle: The ribs of the knit should be stretched only to the same distance they'd sit on a head, not pulled tight. Over-stretching permanently binds the knit to the stabilizer in a stretched state; when released, the fabric collapses back around the stitched area and creates ripples and distortion.
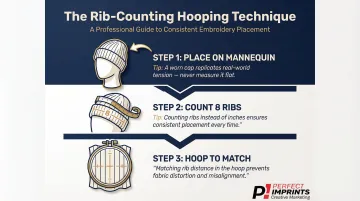
Erich Campbell's rib-counting technique:
- Place the cap on a mannequin head or willing volunteer
- Measure across 8 ribs with a fabric tape while worn
- When hooping, gently stretch the fabric so those same 8 ribs match the exact distance measured
Use hand-basting stitches around the outer edge of the embroidery area to hold the cap layers in place without catching the back of the cap.
Step 4: Add the Water-Soluble Topper
Place a layer of water-soluble stabilizer on top of the hooped embroidery area and tape or clip it in place. This topper prevents stitches from sinking into the knit texture — without it, stitches disappear into the valleys between ribs and the finished design looks uneven.
Think of it as a "snowshoe": it keeps stitches sitting above the fabric surface, not buried in it.
Step 5: Embroider the Design
With the topper secured, run a basting stitch first to lock all layers together. Clip excess cap fabric away from the machine path to prevent it from getting caught. Embroider at a moderate speed (400–600 stitches per minute) to ensure accurate thread placement and reduce vibration.
Step 6: Finish and Clean Up
After embroidering:
- Remove basting stitches
- Trim the cutaway stabilizer close to the stitches without nicking the knit
- Peel or rinse away the water-soluble topper according to manufacturer instructions
- Lay the cap flat to air dry — never wring or twist the knit
Key Parameters That Affect Embroidery Quality on Knit Caps
Even with the correct process, results vary significantly based on four controllable variables. Getting these wrong is the most common reason experienced embroiderers still produce poor results on knits.
Hooping Tension (Stretch Level)
Over-stretching permanently binds the knit to the stabilizer in a stretched state. When released, the excess fabric collapses back around the stitched area, causing ripples and design distortion.
Use the rib-counting measurement technique described earlier. Measure across 8 ribs on a head-sized form, then replicate that same rib spacing when hooping. The cap should feel relaxed in the hoop, not drum-tight.
Stabilizer Combination
Cutaway alone does not prevent stitches from sinking into the knit pile — the water-soluble topper is what keeps stitches sitting above the fabric surface. Skipping it results in thread that disappears into thick or ribbed textures, especially for small text and fine detail.
Always use both layers:
- Cutaway underneath for permanent structural support
- Water-soluble topper on top for surface clarity and stitch definition
Digitizing: Underlay and Stitch Density
Knits lack the structural stability of woven fabrics. Without proper underlay, top stitches have nothing to anchor to and will shift or distort as the machine runs.
Use a double zigzag or edge-walk underlay to bridge the valleys between ribs and lift top stitching above the texture. Think of it like a boardwalk over a grassy field — planks laid across the deep valleys give the top stitches a secure surface to grab onto.
Also reduce stitch density by 20–30% compared to woven fabrics — spacing of 0.50mm to 0.60mm instead of 0.40mm — to prevent stiffness and preserve stretch.
Design Size Relative to Embroidery Area
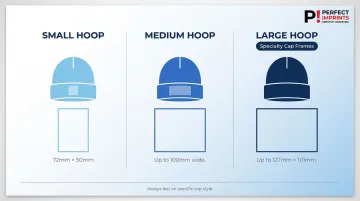
The stabilizer limits stretch in the hooped area. If the design is wider than the hoop allows, the cap will feel too tight when worn. General size guidelines:
- Small hoops: Approximately 72mm tall × 50mm wide
- Medium hoops: Up to 100mm wide
- Large hoops: Up to 127mm × 101mm (specialty cap frames)
These are starting reference points, not absolute rules. Always test placement on the specific cap style you're embroidering.
Common Mistakes and How to Troubleshoot Them
Most embroidery problems on knit caps trace back to a handful of repeatable errors. Here's what to watch for — and how to fix each one.
Overstretching the cap in the hoop is the single most common mistake. Always hoop with measured, head-level tension. A correctly hooped cap shows smooth, even stitches; an overstretched one shows wavy, rippled fabric around the design after unhooping.
Skipping the water-soluble topper lets stitches sink into the knit texture. Letters come out fuzzy, fragmented, or partially invisible — use a topper on every knit project, even relatively flat ones.
Using a sharp needle instead of a ballpoint pierces yarn fibers rather than passing between them, causing snags, holes, and mid-run thread breaks. Pinholes sometimes don't show until after washing. Switch to a ballpoint needle (75/11 or 80/12) before starting any knit cap job.
Thread breaks and tension problems during stitching usually point to one of three causes:
- A dull or bent needle — replace it first
- Upper tension set too high — reduce slightly and test
- Stitch density too high for the fabric — reduce by 20–30%
Work through these in order. Most thread issues resolve at step one or two.
Alternatives to Direct Embroidery on Knit Caps
Direct embroidery isn't always the right solution — especially for large filled logos, very dense designs, or front panels where heavy stitching would crush the knit's insulating air pockets. Three alternatives are worth knowing before you commit to a method.
Patch and Applique Method
Stitching the logo onto a patch first, then attaching the patch to the knit cap, avoids most knit embroidery challenges.
When this is better:
- Large fill areas that would create stiffness
- Complex logos with fine detail
- When the cap's warmth and loft must be preserved
Trade-offs:
- Slightly raised profile on the cap
- Extra production step (embroider patch, then attach)
- Patches can be sewn or heat-pressed (sewn lasts longer under abrasion)
Heat Transfer and Screen Printing
For very high-volume runs or designs with photographic detail, heat transfer vinyl or screen-printed transfers are faster and more cost-effective.
Durability benchmarks: Professionally applied heat transfer patches survive 40 to 50+ wash cycles, while traditional sew-on patches last 60-100+ washes.
Trade-offs:
- Less durable than embroidery
- Different texture and feel
- Not always appropriate for premium caps
- Extreme caution required on acrylic beanies (high heat can melt synthetic fibers)
Professional Embroidery Services
For organizations ordering custom knit caps in bulk — sports teams, companies, nonprofits, church groups — outsourcing to a professional removes the learning curve on digitizing, hooping setup, and stabilizer selection.
Professional services handle the full workflow, including:
- Digitizing optimization for stretch fabrics
- Stabilizer selection and hooping tension
- Quality checks across large production runs
Perfect Imprints offers custom embroidered promotional products and corporate gifts with logo for bulk orders, making them a straightforward option when consistency across a large cap run matters.
Frequently Asked Questions
Can you machine embroider on knit caps?
Yes — with the right setup. Use a cutaway stabilizer underneath paired with a water-soluble topper, a ballpoint needle (size 75/11), and hooping tension that matches how the cap fits on a head.
What stabilizer should be used for machine embroidery on knit caps?
Use a cutaway stabilizer (2.5–3.0oz) underneath for permanent support and a water-soluble topper on top to keep stitches from sinking into the knit. Tearaway stabilizer is not suitable for stretchy knits.
What needle is best for machine embroidery on knit caps?
Use a ballpoint needle in size 75/11 (or 80/12 for thicker caps). Ballpoint tips push yarn fibers aside rather than piercing them, which prevents snags and preserves the knit over time.
Where should an embroidered logo be placed on a beanie?
The standard placement is centered on the folded cuff, with the design's top edge facing the open cuff so it reads correctly when worn. Non-cuffed styles typically use front-panel placement instead.
How do I prevent puckering when embroidering on a knit cap?
Puckering comes from over-stretching during hooping or insufficient stabilization. Use the rib-counting technique to match hooping tension to how the cap fits on a head, and stabilize with a cutaway plus water-soluble topper.
Can I embroider a knit cap without a hoop?
Yes, floating (hooping only the stabilizer and attaching the cap on top) is a valid alternative for caps too thick to hoop normally. Use basting stitches or pins to secure the cap to the hooped stabilizer before embroidering.